This is a good question!
Unfortunately, the DJI-provided situation on this front is nontrivial.
I will speak to the overall state of affairs, and provide the context I think is most relevant. What I don’t know is what resources are available from DJI that they would normally point a new team at – I’d appreciate others chiming in with anything they’re aware of.
This post is not going to be a tutorial – I’ll outline the puzzle pieces you have available and some leads to get started, but not the full process. Myself and others can surely give more targeted help as you get into it. And if others do have tutorials available to link, I’m sure those would be appreciated.
As noted below, I’m going to follow up in a separate post with what my team is actually doing for our software, replacing the “software” section in this post.
Hardware
Before we get into how to do what you’d like, we should make sure you understand the hardware you have.
RoboMaster Development Board
There are two (technically, 3, but we don’t talk about the estranged cousin) RoboMaster Development Boards: Type A and Type C. Type A is the original, and is what old(er) teams including ARUW use. Type C is newer and DJI recommends it for new teams, but it isn’t clear that it’s actually better. I will refer to “dev board” in general to refer to the commonalities between both types.
A dev board is a custom circuit board designed by DJI which includes, among other things:
- An STM32F4 microcontroller. This is the STM32F427IIH6 for the Type A and STM32F407IGH6 for the Type C. The microcontroller has some built-in flash memory for storing your program and knows how to run that code on boot. It also has I/O pins for communicating with external devices.
- Power regulation and a power input port (XT-30 connector, I believe) to power the board from a Power Management Module or battery. Note that this isn’t required if the board is connected to your PC (see below).
- Some power outputs, either 24V or 12V. These aren’t legal to be used for motors, but you can use them for other computing hardware.
- An SWD debug port, connected to the microcontroller, for flashing code and debugging.
- An other misc I/O of varying importance and an IMU (Inertial Measurement Unit).
Note that the dev boards have manuals, schematics and other related information available online. I won’t include them all here but if you’re looking for those resources, feel free to ask. They aren’t great but do get the job done often.
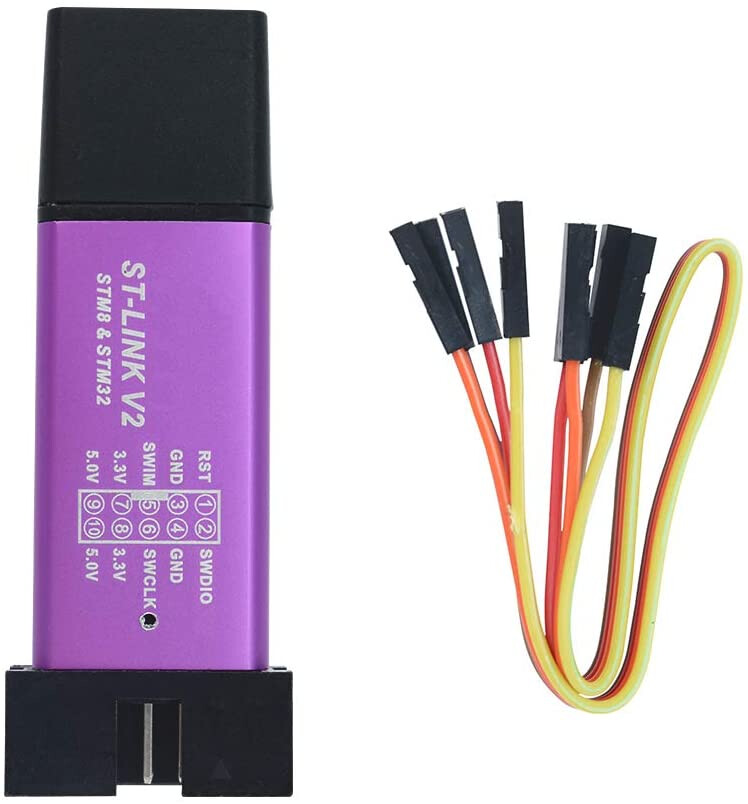
ST-Link (or J-Link)
That SWD debug port is how you program the board – but you need some hardware to interface with that port.
The typical solution is an ST-Link – in particular, usually an ST-Link V2 Mini. They look something like this:
You plug the SWDIO, GND, SWCLK and 3.3V lines into the SWD port on the dev board – they’re labelled. The ST-Link itself plugs into your PC via USB.
To connect them, you’ll need an appropriate cable. I’ve never ordered these things, so I can’t be of much help on their proper name. But the specs page lists the connector as:
4-Pin SWD Cable:1.25-mm pitch 4-pin / 2.54-mm pitch DuPont & 26 AWG flexible flat & 500mm
Perhaps others can chime in with a good link to order the “0.1in header” to “DuPont something-or-other” cables.
An aside: J-Links
The primary alternative to ST-Links are J-Links. They’re made by a different company, and come in a few variants (“real” J-Links, Chinese knock-offs, and “J-Link Edu Mini”, perhaps among others). They have some extra capabilities and mostly separate software ecosystem. Some teams use them (including us) – we’re looking to buy a bunch of the “J-Link Edu Mini”, assuming they work.
Software
The Dev Boards are purely hardware – a microcontroller and some devices it can talk to. Unlike, say, Arduino, there’s no software toolkit that comes with it. You have to pick some tools and libraries to use, and they’re going to be a lot lower-level than what you may be used to with consumer/hobbyist boards. You are on your own to pick the tools you use, so long as it produces a compatible ARM binary in the end.
Below, I’m going to describe the “default” option promoted by DJI. I’ll follow up in a separate post with what we actually do, and what a handful of other teams are collaborating with us on.
Drivers
If on Windows, you’ll need the ST-Link driver from ST’s website. The toolchain I’m discribing below only works on Windows, so that’s really all there is to it.
However, for later reference if using other tools – for Linux, this software is what we’ve used (GitHub - stlink-org/stlink: Open source STM32 MCU programming toolset). We have also gotten it working on Mac but I don’t recall the details.
Editor and toolchain
Most teams use Keil MDK-Arm: Arm Keil MDK: Flexible MCU Software Development Tools – Arm®. It’s an IDE with built-in compiler that is the de-facto standard for programming ARM chips with vendor software.
Keil is paid. There are crackers available freely, which I think most RM teams use (shhhhh – but ping on Discord if you need it). There’s a somewhat limited evaluation version, which is what you’ll probably use anyway.
The built-in compiler supports C and at least some C++ if you decide to use it. It has a built-in debugger which is pretty fully-featured and works with the ST-Link.
Hardware Abstraction Layer (HAL) and driver code
I’m lumping two things together here because they probably won’t vary independently for a new team:
- The HAL, which is a software library that hides the extreme details of specific hardware registers and modes. It provides a more convenient programmatic API to interact with hardware. You still need to know a lot of details about the STM32F4 to use most HALs, but they make it easier.
- Core drivers, such as those for operating CAN and DJI motors, or for the remote control. These use the HAL to operate hardware in a way appropriate for RoboMaster devices you’ve plugged in.
The HAL that most teams use is one generated by STM32 Cube MX: https://www.st.com/en/development-tools/stm32cubemx.html. You open the software and tell it the board in use, configure the involved pins, and select how the hardware should be configured. It then spits out some HAL code for you.
To go along with this, DJI provides some example code. Teams often copy the CubeMX project from here as a starting point, and then edit it to suit their needs. They also typically copy in the motor driver code and related logic. GitHub - RoboMaster/DevelopmentBoard-Examples
Note that the above link is for the Type A board. The Type C examples are significantly more thorough, and in English. GitHub - RoboMaster/Development-Board-C-Examples. Most of what they do here is also applicable to the Type A, but the specific pins and CubeMX configuration is different.
This combination of HAL and drivers requires a fair amount of knowledge (which you can learn over time) to be comfortable. It also produces extremely ugly, hard-to-maintain code. But it’s the most widely tested approach. And you can progressively replace DJI’s sample code with e.g. your own motor drivers – they aren’t truly hard to write.
Programming language
The above is primarily targeted at C. Some teams enable the C++ features of CubeMX/Keil and write C++, but I don’t have any experience with that.
Application code
This is your own robot control logic. Most of it is up to you, and particular controls questions warrant their own threads. People here would be happy to help.
The main point I’d like to make here is: most of robot programming is taking in inputs (remote control, motor encoders, referee system data) and then producing outputs (motor commands, driver feedback) in a loop. So your code will likely have a top-level loop which is responsible for doing those things – read from some inputs, call functions that handle operating your major subsystems, and then write the final results. And you do that at some high frequency.
Getting started with this software stack
The high-level overview is:
Other references
Lots of teams have open-sourced their controls code, mostly to compete for the “open-source prize” that DJI awards each year. You or others are free to create a new thread to link open source submissions and I can post some of the ones I’m familiar enough. Most of them will be a lot more advanced than what you’ll start out with, but they’re nonetheless potentially helpful.
 ) if you want to go this route.